

Every year when the first snowflake falls, I find myself reaching for my baking sheets to start our Christmas traditions. These Melted Snowman Cookies are easily the most requested treat in my house because they look so whimsical and taste like a dream. I love how they bring a bit of winter magic to the dessert table while keeping things simple and sweet for everyone to enjoy during the holiday season.
Recipe Details
Recipe Information
- Prep Time: 20 minutes
- Cook Time: 10 minutes
- Total Time: 30 minutes
- Servings: 24 cookies
- Difficulty: Easy
Nutrition Information (Per Serving)
- Calories: 185
- Protein: 2g
- Carbs: 26g
- Fat: 8g
Why You’ll Love This Melted Snowman Cookies
These cookies are the perfect blend of a classic sugar cookie and a creative craft project. They are incredibly festive for Christmas parties and the “melted” look means you do not have to worry about being a professional decorator. Since each snowman is supposed to look like it is melting, every cookie is unique, which takes all the pressure off and makes it a fun activity for kids and adults alike. Plus, the combination of a soft cookie base with a fluffy marshmallow head is absolutely irresistible.
Melted Snowman Cookies Ingredients & Substitutions
- 1/2 cup unsalted butter, softened
- 3/4 cup granulated sugar
- 1 large egg
- 1 teaspoon alcohol-free vanilla extract
- 1 1/2 cups all-purpose flour
- 1/2 teaspoon baking powder
- 1/4 teaspoon salt
- 24 large marshmallows
- 1 1/2 cups powdered sugar
- 2 to 3 tablespoons milk or water
- Orange and black decorating icing or gel
- Small chocolate candies or sprinkles for buttons
If you are short on time, you can substitute the homemade dough with a store-bought sugar cookie mix or pre-made refrigerated dough. For the icing, you can use melted white chocolate chips instead of the powdered sugar glaze for a richer flavor and a quicker set time. If you do not have decorating gel, you can mix a tiny bit of food coloring into small bowls of the icing to create your own colors for the snowman faces and arms.
Step-by-Step Instructions to Make Melted Snowman Cookies
Step 1: Preparation
Preheat your oven to 350 degrees Fahrenheit. Line two large baking sheets with parchment paper or silicone baking mats to ensure the cookies do not stick and are easy to remove after baking.
Step 2: Cream the Butter and Sugar
In a large mixing bowl, beat the softened butter and granulated sugar together until the mixture is light and fluffy. This usually takes about two to three minutes with an electric mixer.
Step 3: Add Wet Ingredients
Add the egg and the alcohol-free vanilla extract to the butter mixture. Beat again until everything is well combined and smooth, scraping down the sides of the bowl as needed.
Step 4: Mix Dry Ingredients
In a separate small bowl, whisk together the flour, baking powder, and salt. Gradually add the dry ingredients to the wet ingredients, mixing on low speed until a soft dough forms. Do not overmix, as this can make the cookies tough.
Step 5: Bake the Cookies
Roll the dough into one-inch balls and place them two inches apart on the prepared baking sheets. Bake for 8 to 10 minutes, or until the edges are just barely golden. Remove from the oven and let them cool completely on a wire rack before decorating.
Step 6: Make the Icing Puddle
Whisk together the powdered sugar and milk in a small bowl until you have a thick but spreadable icing. Spoon a small amount onto each cooled cookie, spreading it toward the edges in an uneven circle to look like a melting puddle of snow.
Step 7: Assemble the Snowmen
While the icing is still wet, place a marshmallow near the back or side of the “puddle” to act as the head. Let the icing set for a few minutes so the marshmallow stays in place.
Step 8: Decorate the Details
Using the orange icing, draw a small carrot nose on each marshmallow. Use the black icing to dot on eyes and a coal mouth, then draw stick arms onto the white icing puddle. Add small candies or dots of icing for buttons to finish the look.
Tips for Success
Make sure your cookies are completely cool before you add the icing, otherwise the “puddle” will run right off the edges. When adding the marshmallow, you can microwave it for just 2 to 3 seconds if you want it to look a little slumped or extra melted, but be careful not to overdo it. If your icing is too thin, add more powdered sugar a tablespoon at a time until it reaches the right consistency to stay on the cookie.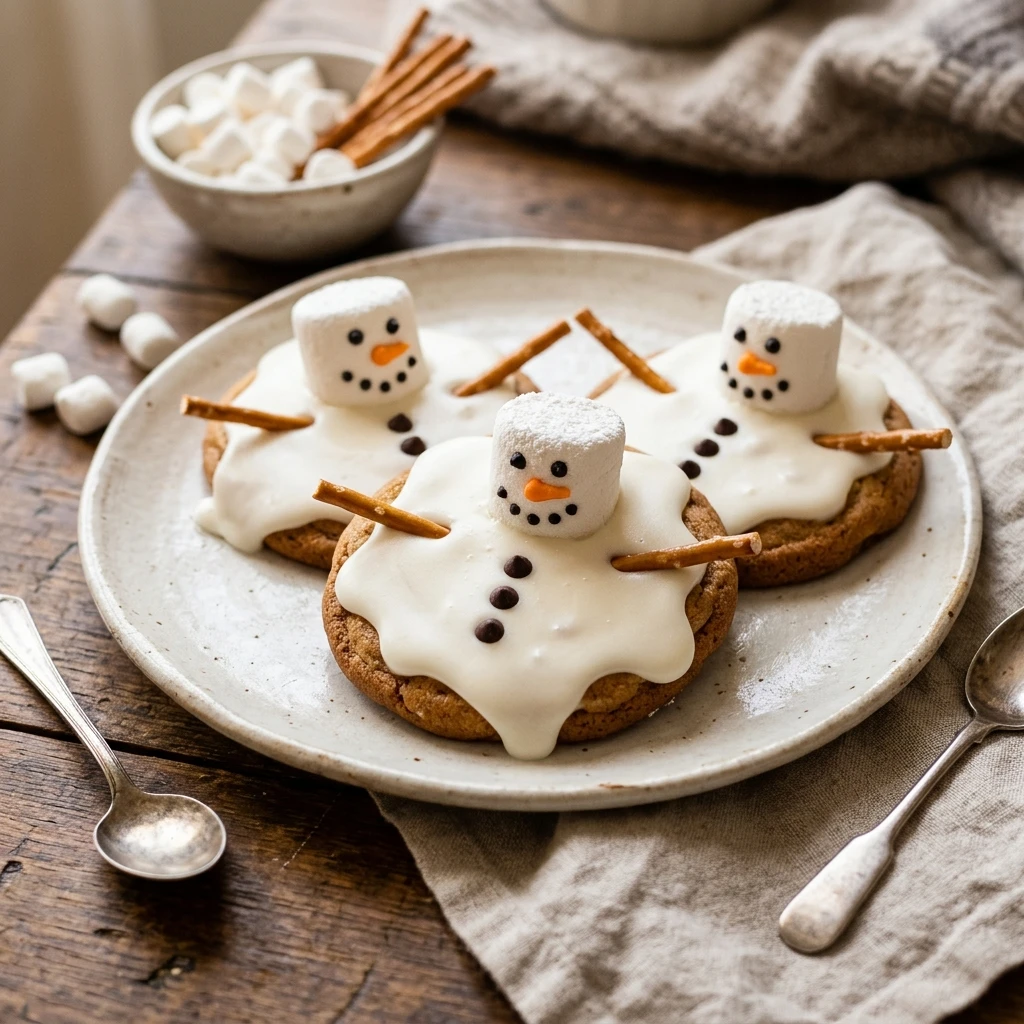
Variations of Melted Snowman Cookies
For a chocolate version, you can swap the sugar cookie base for a dark cocoa cookie. You can also add a teaspoon of peppermint extract to the dough for a classic Christmas flavor profile. If you want to give your snowmen some personality, use small pieces of fruit leather or sour candy strips to create tiny scarves around their necks before the icing dries.
Serving Suggestions: What to Pair with Melted Snowman Cookies
These cookies are best served with a warm mug of homemade hot chocolate topped with whipped cream. They also look beautiful on a holiday dessert platter alongside gingerbread men, peppermint bark, and sugar-coated cranberries. For a festive party, serve them with a cold glass of milk or a sparkling apple cider to balance out the sweetness of the icing and marshmallow.
Storage & Reheating Instructions
Store these cookies in a single layer in an airtight container at room temperature for up to 3 days. Because of the marshmallows and icing, stacking them can cause them to stick together and ruin the decorations. If you need to stack them, place a sheet of parchment paper between the layers very carefully. These cookies do not require reheating and are best enjoyed at room temperature.
Memories Made Around the Table
I remember one specific Christmas Eve when the kitchen was covered in powdered sugar and my kids were competing to see who could make the “silliest” melting snowman. We laughed so hard at a snowman whose head had rolled halfway off the cookie, and that silly little cookie became the star of our dessert tray. It is those messy, unscripted moments that make holiday baking so special, and these cookies are the perfect catalyst for that kind of family joy.
FAQs
Can I make the cookies ahead of time?
Yes, you can bake the cookie bases up to two days in advance and store them in an airtight container. I recommend waiting to add the icing and marshmallow decorations until the day you plan to serve them so the marshmallows stay fresh and the icing looks its best.
Why is my icing running off the cookie?
This usually happens if the icing is too thin or if the cookies were still warm when you decorated them. Try adding a bit more powdered sugar to thicken the glaze, and always ensure the cookies are cool to the touch before you start the decorating process.
How do I stop the marshmallow from falling over?
The icing acts as a glue, so make sure your icing is thick enough to hold the weight. If you find they are sliding, let the icing sit for 30 seconds to a minute to thicken up slightly on the cookie before you press the marshmallow into place.
Can I freeze these cookies?
You can freeze the baked cookie bases without the icing for up to three months. However, I do not recommend freezing the fully decorated cookies because the marshmallows can become tough and the icing may crack or weep as it thaws.
What can I use instead of decorating gel?
You can use melted chocolate or even a small amount of the white icing mixed with food coloring. Use a toothpick or a very small piping tip to draw the fine details like the eyes, mouth, and stick arms.
Final Thoughts
Melted Snowman Cookies are a delightful way to celebrate the Christmas season with a touch of humor and a lot of flavor. They are simple enough for beginners but look impressive enough to be the centerpiece of any holiday gathering. Whether you are baking them for a gift exchange or just as a weekend treat with the family, these cookies are sure to bring smiles to everyone who sees them. Happy baking and Merry Christmas!


Melted Snowman Cookies
- Total Time: 30 minutes
Ingredients
- 1/2 cup unsalted butter, softened
- 3/4 cup granulated sugar
- 1 large egg
- 1 teaspoon alcohol-free vanilla extract
- 1 1/2 cups all-purpose flour
- 1/2 teaspoon baking powder
- 1/4 teaspoon salt
- 24 large marshmallows
- 1 1/2 cups powdered sugar
- 2 to 3 tablespoons milk or water
- Orange and black decorating icing or gel
- Small chocolate candies or sprinkles for buttons
Instructions
- Preheat your oven to 350 degrees Fahrenheit. Line two large baking sheets with parchment paper or silicone baking mats to ensure the cookies do not stick and are easy to remove after baking.
- In a large mixing bowl, beat the softened butter and granulated sugar together until the mixture is light and fluffy. This usually takes about two to three minutes with an electric mixer.
- Add the egg and the alcohol-free vanilla extract to the butter mixture. Beat again until everything is well combined and smooth, scraping down the sides of the bowl as needed.
- In a separate small bowl, whisk together the flour, baking powder, and salt. Gradually add the dry ingredients to the wet ingredients, mixing on low speed until a soft dough forms. Do not overmix, as this can make the cookies tough.
- Roll the dough into one-inch balls and place them two inches apart on the prepared baking sheets. Bake for 8 to 10 minutes, or until the edges are just barely golden. Remove from the oven and let them cool completely on a wire rack before decorating.
- Whisk together the powdered sugar and milk in a small bowl until you have a thick but spreadable icing. Spoon a small amount onto each cooled cookie, spreading it toward the edges in an uneven circle to look like a melting puddle of snow.
- While the icing is still wet, place a marshmallow near the back or side of the “puddle” to act as the head. Let the icing set for a few minutes so the marshmallow stays in place.
- Using the orange icing, draw a small carrot nose on each marshmallow. Use the black icing to dot on eyes and a coal mouth, then draw stick arms onto the white icing puddle. Add small candies or dots of icing for buttons to finish the look.
- Cook Time: 30 minutes
- Diet: Vegetarian