

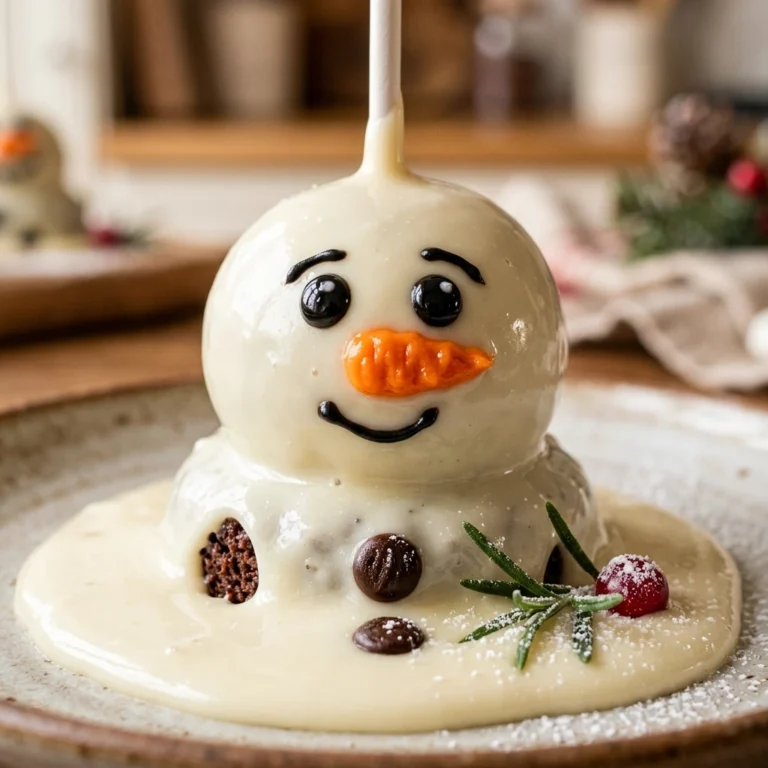
Every year when the first frost hits the window, I start thinking about playful Christmas treats that bring a smile to everyone’s face. These Melted Snowman Cake Pops are a favorite in my kitchen because they turn a little baking mishap into a festive masterpiece. I love how they capture the whimsical side of winter without requiring perfect decorating skills, making them a stress-free addition to any holiday dessert table.
Recipe Details
Recipe Information
- Prep Time: 45 minutes
- Cook Time: 30 minutes
- Total Time: 75 minutes
- Servings: 12 cake pops
- Difficulty: Easy
Nutrition Information (Per Serving)
- Calories: 210
- Protein: 2g
- Carbs: 30g
- Fat: 9g
Why You’ll Love This Melted Snowman Cake Pops
You will absolutely adore this recipe because it embraces imperfection. Unlike traditional cake pops that need to be perfectly spherical, these are meant to look like they are puddling on the plate, which takes all the pressure off the decorator. They are a fantastic project for kids during Christmas break, and the combination of moist cake and crunchy white chocolate is always a crowd-pleaser. Plus, they look incredibly professional on a holiday platter despite being very simple to assemble.
Melted Snowman Cake Pops Ingredients & Substitutions
- 1 baked vanilla cake, 9-inch round or square
- 1/2 cup vanilla frosting
- 12 ounces white chocolate melting wafers
- 12 large marshmallows
- 1 teaspoon alcohol-free vanilla extract
- Orange decorating icing or small orange sprinkles for noses
- Black decorating gel or mini chocolate chips for eyes and buttons
- Pretzel sticks, broken in half for arms
If you do not have vanilla cake, chocolate or red velvet works wonderfully as the hidden surprise inside. You can use plant-based butter or coconut oil in your cake batter if you are looking for dairy alternatives, and agar-agar based marshmallows are a great swap for standard ones if needed. If melting wafers are unavailable, high-quality white chocolate chips mixed with a teaspoon of coconut oil will provide a smooth finish for the melted look.
Step-by-Step Instructions to Make Melted Snowman Cake Pops
Step 1: Crumble the Cake
Once your baked cake has cooled completely, use your hands to crumble it into fine pieces in a large mixing bowl. Ensure there are no large chunks left so the texture of the pops remains smooth and consistent.
Step 2: Mix in Frosting and Vanilla
Add the vanilla frosting and the alcohol-free vanilla extract to the cake crumbs. Use a sturdy spoon or your hands to mix everything together until it reaches a dough-like consistency. You should be able to roll a ball that holds its shape without falling apart.
Step 3: Shape the Cake Bases
Scoop out about two tablespoons of the mixture at a time and roll them into balls. Place them on a parchment-lined baking sheet and flatten them slightly so they look like a mound rather than a perfect sphere. Chill them in the refrigerator for at least 20 minutes to firm up.
Step 4: Melt the Coating
In a microwave-safe bowl, melt the white chocolate wafers in 30-second intervals, stirring in between, until the chocolate is completely smooth. Be careful not to overheat the chocolate, as white chocolate can seize easily.
Step 5: Create the Melted Look
Take a chilled cake mound and place it on a wire rack or a fresh sheet of parchment paper. Spoon the melted white chocolate over the top, letting it drip down the sides unevenly to create a “puddle” effect on the bottom. While the chocolate is still wet, place a large marshmallow on top of the cake mound to serve as the snowman’s head.
Step 6: Decorate the Snowmen
Before the chocolate sets completely, insert two pretzel stick halves into the sides of the cake mound for arms. Use the black decorating gel to dot eyes and a mouth on the marshmallow, and a row of buttons on the cake base. Finish by adding an orange icing nose or an orange sprinkle to the marshmallow face.
Tips for Success
For the best results, make sure your cake is completely cool before crumbling, as warm cake can turn the frosting into a greasy mess. If your white chocolate is too thick to pour, add a tiny bit of vegetable shortening or coconut oil to thin it out. Chilling the cake balls is a vital step because it prevents them from falling apart when you pour the warm chocolate over them. Always decorate while the chocolate is slightly tacky so the pretzel arms and buttons stay securely in place.
Variations of Melted Snowman Cake Pops
You can get creative with these by adding different flavors to the cake, such as peppermint or lemon. For a colorful twist, use fruit leather or sour belts to wrap around the marshmallow “neck” as a tiny scarf. You can also use mini peanut butter cups or small chocolate sandwich cookies as top hats for your snowmen. If you want a more “frozen” look, sprinkle a bit of clear sanding sugar over the wet chocolate for a glittery, snowy effect.
Serving Suggestions: What to Pair with Melted Snowman Cake Pops
These festive treats are the perfect companion to a steaming mug of hot cocoa or a warm spiced apple cider. They look beautiful when served on a platter surrounded by “snow” made of shredded coconut or powdered sugar. If you are hosting a Christmas party, pair them with other holiday classics like gingerbread men or peppermint bark to create a varied dessert display that caters to all tastes.
Storage & Reheating Instructions
Store your finished cake pops in an airtight container in the refrigerator for up to 5 days. Because of the marshmallow and the chocolate coating, they do not require reheating and are best enjoyed chilled or at room temperature. If you need to stack them, place a piece of parchment paper between layers to prevent the decorations from smudging or sticking together. Do not freeze the fully decorated pops, as the marshmallows can become chewy and the chocolate may crack.
Memories Made Around the Table
I remember one Christmas Eve when the kids and I spent the whole afternoon giggling over the silly expressions we gave our snowmen. It did not matter if the chocolate puddled perfectly because that is exactly how a melted snowman should look. These treats have become a tradition in our home that reminds us to find the joy in the messy, sweet moments of the holidays. Every time I see a tray of these lopsided, grinning snowmen, I am transported back to those cold afternoons filled with warmth and laughter.
FAQs
Can I make these Melted Snowman Cake Pops ahead of time?
Yes, you can certainly make these a day or two in advance. Just be sure to store them in a cool place or the refrigerator so the chocolate stays firm and the cake stays moist inside.
What if my chocolate coating is too thick to pour?
If the chocolate is too thick, stir in a teaspoon of coconut oil or vegetable shortening. This will thin it out and give it a beautiful glossy finish that is perfect for the “melted” look.
Do I need to use cake pop sticks?
No, these are designed to be “melted” on a flat surface, so no sticks are required. This makes them much easier to transport and serve at parties than traditional cake pops.
Can I use a store-bought cake for this recipe?
Absolutely. Using a store-bought pound cake or a pre-made sheet cake is a great time-saver. Just make sure to remove any thick frosting or hard crusts before crumbling.
How do I prevent the marshmallows from sliding off?
Wait until the chocolate has cooled just slightly and thickened before placing the marshmallow on top. If the chocolate is too runny, the marshmallow may slide, but as it begins to set, it will act like glue.
Final Thoughts
Melted Snowman Cake Pops are the ultimate stress-free holiday treat that brings a touch of whimsy to your Christmas celebrations. They prove that you do not need to be a master pastry chef to create something memorable and delicious. Whether you are making them for a school bake sale or as a fun family activity, these little snowmen are sure to melt hearts and disappear quickly from the dessert table. Enjoy the process and the sweet rewards of your festive baking!

Melted Snowman Cake Pops
- Total Time: 1 hour 15 minutes
Ingredients
- 1 baked vanilla cake, 9-inch round or square
- 1/2 cup vanilla frosting
- 12 ounces white chocolate melting wafers
- 12 large marshmallows
- 1 teaspoon alcohol-free vanilla extract
- Orange decorating icing or small orange sprinkles for noses
- Black decorating gel or mini chocolate chips for eyes and buttons
- Pretzel sticks, broken in half for arms
Instructions
- Once your baked cake has cooled completely, use your hands to crumble it into fine pieces in a large mixing bowl. Ensure there are no large chunks left so the texture of the pops remains smooth and consistent.
- Add the vanilla frosting and the alcohol-free vanilla extract to the cake crumbs. Use a sturdy spoon or your hands to mix everything together until it reaches a dough-like consistency. You should be able to roll a ball that holds its shape without falling apart.
- Scoop out about two tablespoons of the mixture at a time and roll them into balls. Place them on a parchment-lined baking sheet and flatten them slightly so they look like a mound rather than a perfect sphere. Chill them in the refrigerator for at least 20 minutes to firm up.
- In a microwave-safe bowl, melt the white chocolate wafers in 30-second intervals, stirring in between, until the chocolate is completely smooth. Be careful not to overheat the chocolate, as white chocolate can seize easily.
- Take a chilled cake mound and place it on a wire rack or a fresh sheet of parchment paper. Spoon the melted white chocolate over the top, letting it drip down the sides unevenly to create a “puddle” effect on the bottom. While the chocolate is still wet, place a large marshmallow on top of the cake mound to serve as the snowman’s head.
- Before the chocolate sets completely, insert two pretzel stick halves into the sides of the cake mound for arms. Use the black decorating gel to dot eyes and a mouth on the marshmallow, and a row of buttons on the cake base. Finish by adding an orange icing nose or an orange sprinkle to the marshmallow face.
- Cook Time: 75 minutes
- Diet: Vegetarian